Showing posts with label Code samples. Show all posts

Monday, January 18, 2016

ArchivesSpace + Vagrant = Archivagrant

If you're anything like me, you find yourself regularly creating, destroying, and recreating ArchivesSpace instances to run test migrations with a slightly modified set of data, to test new or updated plugins, or to verify that everything that previously worked still works with a new version of ArchivesSpace. Manually downloading an ArchivesSpace release, setting up a MySQL database, editing or copying over a config file, setting up default values, and all of the other steps that go into getting an ArchivesSpace release ready for testing can be a time consuming process. If you're even more like me, you went through this process countless times, all the while thinking "there must be a better way" without realizing the entire time that there is, indeed, a better way: Vagrant.

Vagrant is an application that allows users to create a single configuration file (aka a Vagrantfile) that can be used, shared, and reused to "create and configure lightweight, reproducible, and portable development environments" in the form of virtual machines. Vagrant, and tools like it, have been widely used by developers to solve issues that arise when development on a single application is done in a variety of development environments and to make the process of configuring a development environment across time, users, and operating systems easier and more consistent. Vagrant allows users to do some upfront work to configure an environment so that other people working on a project (and their future selves) will not have to worry about going through manual, time-consuming, and error-prone configuration steps ever again. While we aren't doing a lot of heavy developing, repurposing an existing tool like Vagrant to cut down on the amount of time we spend unzipping directories, editing config files, installing plugins, and so on allows us to focus on the work that we really need to do.

This blog post will walk through our ArchivesSpace Vagrant (or, Archivagrant) project to demonstrate how to setup a Vagrantfile and related provisioning scripts that, once written, will download the latest ArchivesSpace release, install dependencies and user plugins, setup ArchivesSpace to run against a MySQL database, and setup some of our local ArchivesSpace default values.

In order to beginning using Vagrant, you will need to first do the following:

  1. Install VirtualBox
  2. Install Vagrant
  3. Install a terminal application with ssh (Secure Shell). If you're on Mac or Linux, the default terminal should work. If you're on Windows and have git installed, the git shell should also work. Another option is to use a Unix-like terminal emulator such as Cygwin, being sure to install the ssh package during setup and installation.

If you've never used Vagrant before and are curious about how it works in general, follow along with the Vagrant Getting Started instructions for information about downloading and installing boxes, setting up a basic Vagrantfile, and provisioning, starting, and accessing a Vagrant virtual machine before continuing with the following instructions.

As detailed in the Vagrant setup instructions, a Vagrantfile is all that's needed to set up a Vagrant virtual machine that can be installed, started, stopped, destroyed, and recreated at any time and on any machine. Here's ours:


The Vagrantfile for this project is pretty simple. First, it indicates that the box to be used is hashicorp/precise32, which is an Ubuntu 12.04 LTS 32-bit box. Next, ports 8080 and 8089 from the guest virtual machine are forwarded to the same ports on the host machine. This will allow us to use the browser on our host machine (the computer running Vagrant) to access the ArchivesSpace application running inside of the virtual machine and interact with the ArchivesSpace application as if it were running on our actual machine using its default backend and staff interface ports. That way, we don't need to worry about finding the IP address of the Vagrant machine or remembering any non-default ports (it also means that we don't need to change anything in the many scripts we have that access the ArchivesSpace API using http://localhost:8089). Next, the Vagrantfile allocates 2 GB of RAM to the virtual machine to improve performance. Finally, the Vagrantfile provisions the virtual machine using three shell scripts: setup_python.sh, setup_mysql.sh, and setup_archivesspace.sh.


The first shell script, setup_python.sh, is fairly short and simple. It first updates Ubuntu's packages (to ensure that we'll be downloading the most up-to-date packages in this and any subsequent provisioning scripts), then installs the Python package manager pip using the Ubuntu package manager, upgrades pip to its latest version, and installs the Python Requests library, which we'll be using later to find and download the latest version of ArchivesSpace and configure our ArchivesSpace defaults.


The next shell script, setup_mysql.sh, installs the Ubuntu mysql-server package, sets up a root username and password (since this is a temporary virtual machine used only for testing purposes, it's okay if the username and password are weak and exposed), and finally creates and configures a database following the official ArchivesSpace documentation for running ArchivesSpace against MySQL.

The final provisioning script, setup_archivesspace.sh, is the most detailed. It also makes use of two separate Python scripts that do the bulk of the work, so for the purposes of this post we'll take a look at setup_archivesspace.sh in two parts. It's worth reiterating that this provisioning script configures ArchivesSpace for our needs here at the Bentley Historical Library, but you should be able to modify it to suit your needs by changing some of the variables and removing some of the plugins (or adding your own).


The first part of the setup_archivesspace.sh shell script is pretty straightforward. The script first installs the Ubuntu packages that will be used in provisioning ArchivesSpace: Java (required by ArchivesSpace), unzip (used to extract the downloaded ArchivesSpace release), and git (used to install plugins from the Bentley's GitHub repository). Then, the shell script calls a separate Python script, download_latest_archivesspace.py, which is used to locate and download the latest release of ArchivesSpace.


This Python script uses the Python Requests library and the GitHub API to find the URL for the latest official ArchivesSpace release, download it, and extract it to the guest machine's home directory.


After downloading and unzipping the latest version of ArchivesSpace, the setup_archivesspace.sh provisioning script sets variables for the database URL and plugins entries to be edited in the ArchivesSpace config file. Then, several plugins are downloaded to the ArchivesSpace plugins directory, including the latest version of the container management plugin, our own EAD importer and exporter plugins, and our slightly modified version of Mark Cooper's very handy aspace-jsonmodel-from-format plugin (used to convert our legacy EADs to ArchivesSpace JSONModel format before posting them via the API -- we'll blog about that at some point, but it makes error identification much easier). Next, the setup_archivesspace.sh script edits the ArchivesSpace config file, replacing the default database URL and plugins entries with the variables that we set up earlier. The script continues by running the ArchivesSpace setup-database.sh script, then configures ArchivesSpace to run at system start (so we won't have to access the virtual machine just to start the application), and starts ArchivesSpace. Finally, the provisioning script calls another Python script, archivesspace_defaults.py, to set up some of our default configurations.


This script uses the ArchivesSpace API to setup some of the default values that we've been using for testing, including setting up a repository, container profiles, classifications, and repository preferences and editing the subject sources and name sources enumerations. While these are all configurations that can easily be set up using the ArchivesSpace staff interface, setting up some of these basic configurations in a provisioning script makes the process of starting and using an ArchivesSpace Vagrant instance that much faster.

Now that we've written our Vagrantfile and associated provisioning scripts, the process of setting up a new ArchivesSpace instance for testing is as simple as doing the following:

  1. Clone the archivagrant GitHub repository (if we haven't already)
  2. Open a terminal application and change directories to the archivagrant directory
  3. vagrant up
The first time that we issue the vagrant up command, it provisions the virtual machine using the scripts detailed above. Once the provisioning process is complete, we can point our host machine's browser to http://localhost:8080 (to access the ArchivesSpace staff interface) and any scripts we have to http://localhost:8089 (to access the ArchivesSpace backend). If we need to gain command line access to the running virtual machine (to stop or restart ArchivesSpace, install any additional packages, mess around in an Ubuntu server without worrying that we're going to break everything, etc.), we can vagrant ssh into it. The virtual machine can be suspended using a vagrant suspend command; shutdown using vagrant halt; and destroyed with vagrant destroy. If suspended or shut down, the virtual machine can be started back up again to its previous state with another vagrant up. If destroyed, a vagrant up will recreate the virtual machine from scratch, going through the entire provisioning process. For the pros and cons of each approach, check out the Vagrant teardown documentation. I use vagrant halt most of the time, but a vagrant destroy is easiest when a new version of ArchivesSpace is released or when I have messed everything up beyond salvation.


Finally, there may be times when we want to start over with a fresh ArchivesSpace database in an existing Vagrant virtual machine without going through the process of recreating the entire machine through a vagrant destroy. The script reset_archivesspace.sh can be run by doing a vagrant ssh into the guest machine and changing directories to the /vagrant directory (a shared folder setup by Vagrant that syncs the contents of the Vagrant project's directory on the host machine to the guest machine).


The script sets up a clean MySQL database and our ArchivesSpace defaults without redownloading ArchivesSpace or reprovisioning the entire machine.

It looks like there are several other ArchivesSpace users that use a Vagrant ArchivesSpace configuration that might be worth checking out if the previously described setup doesn't quite work for you or if you want to see how others are doing it. If you're using some other way to ease the pain of frequently installing ArchivesSpace test instances, let us know!


Monday, October 5, 2015

Tools for the programming archivist: ead manipulation with python and lxml

LXML is an awesome python tool for reading and editing xml files, and we've been using it extensively during the grant period to do programmatic cleanup to our legacy EAD files. To give an example of just how powerful the library is, late last week we ran a script to make tens of thousands of edits to all of our ~2800 EAD files, and it took all of 2 minutes to complete. This would have been an impossible task to complete manually, but lxml made it easy.

We want to share the love, so in this post we'll be walking through how we use the tool to make basic xml edits, with some exploration of the pitfalls and caveats we've encountered along the way.

Setup

Assuming you already have a version of python on your system, you'll first need to install the lxml library

In an ideal world, that should be as easy as running "pip install lxml" from a command-line. If that doesn't work, you have a few options based on what your OS is:

  1. If you're on a mac, try "sudo pip install lxml", and type in your password when prompted.
  2. If you're on windows, you may need to run a special installer. Try this official version. You may be required to first install these two dependencies: libxml2 and libxslt.

We'll also need an ead file (or directory of files) to work on. For this demo we'll be using the ead for the UMich gargoyle collection (raw data here).

Basic usage


Parsing the ead file

First, we need to point lxml to the input ead.

Now we have an lxml "etree" or "element tree" object to work with, and we can do all sorts of things with it. From this parent tree, we can now select individual tags or groups of tags in the ead document to perform actions on, based on just about any criteria we can come up with. To do this we'll first need to use an "xpath" search:


Using xpaths

There are a few things to know about lxml's xpath function:

First, it takes input in the xpath language standard, which is a standardized way to designate exact locations within an xml file. For example, the above search returns a list of every extent tag appearing in the ead file -- the double slashes at the beginning mean that it should look for those tags anywhere in the document. If I wanted to be more specific, I could use an exact search, which would be something like "/ead/archdesc/did/physdesc/extent". We will only be going into basic xpath usage here, but the language is ridiculously powerful - if you're curious as to more advanced things you can do with it, check out this tutorial.

Second, an xpath search always returns a list, even if only one result is found. It's really easy to forget this while writing a quick script, so if you're getting errors talking about your code finding a list when it didn't expect one, that's probably the reason.

A few more xpath examples:


Accessing individual tags and their data

The xpath search will give us a list of results, but to look at or edit any individual tag we'll need to grab it out of the search results. Once we have an individual element (lxml's representation of the tag) we can start to access some of its data:


Tag manipulation

Ok! Now that we know how to get at subsections of the ead file, we can start doing some programmatic edits. In our experience, our edits fall into one of just a few categories of possible changes:

  • editing tag text
  • editing tag types
  • moving tags around
  • creating new tags
  • deleting old tags
  • editing attributes

We'll go through each of these and give some examples and practical tips from our own experience working with EADs at the Bentley.


Editing tag text

This is usually a fairly straightforward task, though there is one big exception when dealing with groups of inline tags. A simple straightforward example:

This gets more complicated when you're dealing with a tag like the following:

<unittitle>Ann Arbor Township records, <unitdate>1991-2002</unitdate>, inclusive</unittitle>

Trying to access unittitle.text here will only return "Ann Arbor Township records, " and ignore everything afterwards. There is no easy way around this through lxml itself, so in these cases we've found it easiest to just convert the whole element to a string using the etree.tostring() method, doing some normal python string manipulation on that result, then converting it back into an element using etree.fromstring() and inserting it back into the ead file. That looks a little like this:

Don't worry if some of that didn't make sense -- we'll be going over more of the creating, inserting, and moving elements later on.


Editing tag types

The most straight-forward of edits. Here's an example:


Editing tag attributes

Attributes are accessed by calling .attrib on the element, which returns a python dictionary containing a set of keys (the attribute names) and their respective values:

Editing the attributes is a pretty straightforward task, largely using python's various dictionary access methods:


Deleting tags

Here you will need to access the parent tag of the tag to be deleted using the element's .getparent() method:


Creating tags

There are two primary ways of going about this - one long and verbose, and the other a kind of short-hand built in to lxml. We'll do the long way first:

The alternate method is to use lxml's element builder tool. This is what that would look like:


Moving tags around

The easiest way to do this is to treat the element objects as if they were a python list. Just like python's normal list methods, etree elements can use .insert, .append, .index, or .remove. The only gotcha to keep in mind is that lxml never copies elements when they are moved -- the singular element itself is removed from where it was and placed somewhere else. Here's a move in action:


Saving the results

Once you've made all the edits you want, you'll need to write the new ead data to a file. The easiest way we've found to do this is using the etree.tostring() method, but there are a few important caveats to note. .tostring() takes a few optional arguments you will want to be sure to include: to keep your original xml declaration you'll need to set xml_declaration=True, and to keep a text encoding statement, you'll need encoding="utf-8" (or whatever encoding you're working with):

We can also pretty-print the results, which will help ensure the ead file has well-formed indentation, and is generally not an incomprehensible mess of tags. Because of some oddities in the way lxml handles tag spacing, to get pretty-print to work you'll need to add one extra step to the the input file parsing process:

Note that the new parser will effectively remove all whitespace (spaces and newlines) between tags, which can cause problems if you have any complicated tag structure. We had some major issues with this early on, and ended up writing our own custom pretty-printing code on top of what is already in lxml, which ensures that inline tags keep proper spacing (as in, <date>1926,</date> <date>1965</date> doesn't become <date>1926,</date><date>1965</date>), and to prevent other special cases like xml lists from collapsing into big blocks of tags. Anyone is welcome to use or adapt what we've written - check it out here!


Thanks for reading along! We've found lxml to be indispensable in our cleanup work here at the Bentley, and we hope you'll find it useful as well. And if you have any thoughts or use any other tools in your own workflows we'd love to hear about them -- let us know in the comments below!

Thursday, September 3, 2015

The ArchivesSpace API

One of the most powerful tools that we've been making use of in our task to migrate our legacy EADs and accession records to ArchivesSpace is the ArchivesSpace API (Application Programming Interface), which allows users to interact with the ArchivesSpace backend to more efficiently and programmatically accomplish any task that can be completed in the ArchivesSpace frontend, including creating, updating, and deleting accessions, resources, archival objects, digital objects, subjects, agents, and other records. While this post will include a very brief introduction to using the ArchivesSpace API, if you are truly a newcomer to APIs in general and to the ArchivesSpace API in particular (as we were just a few months ago!), there is no better place to start than the ArchivesSpace Developer Screencasts put together by Hudson Molonglo, in particular screencast 2, Backend Introduction. Also, while this post will focus on only a few of the available ArchivesSpace API endpoints, all of the available endpoints are detailed in the ArchivesSpace API documentation.

Using the ArchivesSpace API

A major benefit of the ArchivesSpace API is that it allows users to interact with the ArchivesSpace application without having to modify the core application code or use ArchivesSpace's programming language, Ruby. This is great for us as, while we have learned enough Ruby to write some basic ArchivesSpace plug-ins, most of the programmatic work we've been doing for this project has been written in Python. Utilizing the ArchivesSpace API allows us to continue to use a programming language that we are more familiar with, especially with respect to accessing and modifying our legacy data, to interact directly with the ArchivesSpace application. However, while most of the scripts that will be detailed in this post are written in Python, an easier way to get started interacting with the ArchivesSpace API is by using curl in a Mac or Linux terminal or in a Windows Unix emulator such as Cygwin.

Once you've opened up a terminal or Cygwin with curl installed, you can send a simple request to the ArchivesSpace backend to test that the backend API is available. If you're running ArchivesSpace on a test instance on your local computer (which I highly recommend when experimenting with the API, and with the application in general), that request and the resulting response look something like this:


If you're interacting with an ArchivesSpace instance that is not running on your local machine, substitute your ArchivesSpace instance url for localhost and the port on which the backend is running for 8089.

Most of the really powerful things that can be done with the API require users to verify that they have the permissions to do so, so once you've verified that you can communicate with the ArchivesSpace API, the next step is to authenticate and start a session. To authenticate using the default administrator username and password, the request and first part of the response looks like this:


This request returns a longer response than the first one we sent, including the session token that you will need to include in a header that you must send with every subsequent request. Since the session token is a really really long string, it makes things a lot easier if you store the token as a variable, like so:


Subsequent requests sent to the API should include the session token in the header, like this:


This tells ArchivesSpace that you are an authenticated user who is allowed to do all sorts of really powerful and potentially dangerous things. Again, always test your code on a test instance of ArchivesSpace!

The majority of the actions that can be completed via the API take the form of either HTTP get or post requests. As the names may imply, get requests return some data to the user and post requests submit some data to the application. Get and post requests can often be sent to the same backend endpoint, with get requests including the particular ID of a desired record and post requests including the data (in ArchivesSpace JSONModel format) of the record to be created. Here are some quick examples:

A get request that returns the IDs of all resources in repository 2

A get request that returns the JSON representation of resource 3

A get request that returns the JSON representation of subject 1

A post request that creates a new subject. The API returns a  bit of JSON including the ID and uri of the posted subject

The new subject posted via API as seen in the ArchivesSpace staff interface

Authenticating via the API is about as far as the API documentation goes in terms of providing detailed instructions for beginners. Figuring out how to use all of the available API endpoints to your advantage can occasionally be an easy process but, if you're like me, it often involves a lot of trial and error and head scratching over exactly the request, including data and parameters, the ArchivesSpace API requires for each endpoint. We are by no means expert users of the ArchivesSpace API, but we have figured out some really awesome solutions for our particular problems by getting just far enough in our understanding of some of the endpoints. The rest of this post will be spent documenting a few of the projects we've completed using the API. If you're interested in reading about other great work that archivists have done using other API endpoints, check out Maureen Callahan's post on deleting records and Hillel Arnold's post on automating exports using the API.

Disclaimer: All of the following examples are based on our very particular use cases, legacy data, and programming expertise or lack thereof. As such, the exact workflows and Python scripts shared herein will likely not be applicable to most other institutions and their data. Rather, they are intended to serve as examples of what is possible via the ArchivesSpace API and to provide some guidance on how certain endpoints can be used.

Creating Digital Objects

The idea for this script came from a conversation with a colleague about the possibility of automating the creation of digital objects in ArchivesSpace for digitized archival objects using a spreadsheet inventory of a collection containing the ArchivesSpace ref ID for each archival object, a barcode or other sort of identifier for the digitized content, and the url for the digitized content. Such a spreadsheet could easily be created using an ArchiveSpace exported EAD, which contains the ArchivesSpace Ref ID for each archival object as a component level id attribute:

An ArchiveSpace archival object. Note the Ref ID.

That same archival object in an ArchivesSpace exported EAD. Note the <c02> id attribute.

The series of API requests to create a new digital object and link it to the existing archival object goes like this:

1. Using the archival object Ref ID, search ArchivesSpace for the archival object's uri using the search endpoint


This returns a JSON representation of the search results. Since Ref IDs should be unique, there should only be one search result, containing the following bit of information that we're after:

The uri to the archival object that matches the searched for Ref ID
2. Using the archival object uri from the search results, get the JSON representation for that archival object using the get archival object endpoint


This returns the JSON representation for the archival object, which we can store, add a new instance to, and repost to update the archival object using the API

3. Using the archival object's display string (a concatenation of its title and date) from the archival object JSON and the identifier and digital object uri from the spreadsheet, form the JSON for a new ArchivesSpace digital object and post it using the post digital object endpoint


This returns a JSON message containing the uri for the newly created digital object

The posted digital object

4. Using the uri for the new digital object, create a new archival object instance and add it to the archival object JSON
5. Post the updated archival object JSON to the archival object's uri to update the archival object in ArchivesSpace

I've actually only ever done those last two steps in the Python script that I wrote to automate this whole process. That script can be found here, and here are links to the lines corresponding to each of the above steps to see how it's done in Python instead of curl: [1] [2] [3] [4] [5]

As you may be able to tell, curl is really useful for single, simple interactions with the API, and is helpful for testing some of the API endpoints to see how they work. If you have a series of API calls that will need to be strung together and repeated over and over again, it's much easier to do that using a programming language like Python and its requests library.

Creating Subjects and Agents

As we've mentioned many times on this blog before, we are migrating our legacy descriptive metadata to ArchivesSpace using our EADs. As such, one of the limitations we have faced is the stock ArchivesSpace EAD importer, which works for the most part but is not exactly what we need for the data we have. Our solution to that has been our huge EAD cleanup project that we've detailed on this blog in combination with some local modifications to the EAD importer. But what happens when the issue is not due to messy data or to the ArchivesSpace EAD importer, but to the limitations of EAD itself?

EAD 2002 does not have a way of representing subdivided subjects (e.g., Ann Arbor--Dwellings.) or the various components that make up agents (primary name, rest of name, dates of existence) to the same level of granularity of ArchivesSpace (EAD3 will help!). Take a look at this <geogname> in our EAD for instance:


This is imported into ArchivesSpace like this:


When really it should look like this:


We want our data to be migrated to ArchivesSpace as cleanly and correctly as possible and, while subdivided subjects might seem like not-such-a-big-deal, we plan to use ArchivesSpace to export MARC XML records for our collections, we will ultimately want to take advantage of the functionality of EAD3, and new subjects will likely be created in ArchivesSpace following the example in the second ArchivesSpace image above, so now is really the best time to ensure that our legacy subjects will be migrated to ArchivesSpace properly. Enter the API.

Posting subjects via the API is actually really simple (see the example using curl way near the top of this post). What was REALLY complicated about the process of using the API to post our subjects is that a term type is required for each individual term. Since EAD does not have the structure to support multiple terms, much less term types, the HIGHLY messy process that we used looks like this:


1. Agonize over the apparent hopelessness of the issue for a little while, until we realize that we have MARC records for all of our collections and that those MARC records have structured subdivided subjects with terms and term types
2. Get a MARC XML export of all of our archival collections from our catalog
3. Use a combination of scripts to make a csv of all of our unique EAD subjects with subdivided subjects split up into individual terms and a csv of all of our MARC subjects with each individual term and term type identified
4. Run a script that identifies the term type for all individual terms and outputs a csv with all of our unique EAD subjects with individual terms and term types included 
5. Use the API to post all of our subjects to ArchivesSpace correctly, outputting a csv with each subject and the uri of the posted subject in ArchivesSpace
6. Add the posted subject uris to our EADs as ref attributes. We know this is invalid EAD and we know it's wrong, but one of the other ways we've found of getting around the limitations of EAD for this migration is to ignore them! (We're also saving all of our "break the EADs" scripts until just before we migrate)


7. Modify the EAD importer to use a ref attribute to link to existing subjects instead of creating subjects during the import process

That's all it takes to use the API to create over 10,000 well-formed ArchivesSpace subjects! Max has done something similar to split up our agents into their component parts and post them using the API to take advantage of the more structured nature of ArchivesSpace person, corporate entity, and family name records.

Accession Migration

This one actually isn't done yet. As Max's recent post explained, we've recently started looking at migrating our legacy accession records from FileMaker Pro. ArchivesSpace has an accession csv importer but, due to the limitations of the converter, our own messy data, and some of the more complicated things we want to do with our accession imports, we'll need to make some local customizations to how the migration will be done. One option is to modify the accession csv importer as we have modified the EAD importer but, as we've been learning more and more about the API, we've realized that it will be much easier for us to come up with our own accession migration script that will use the API to migrate our accession records in the way that we want with the data that we have. We'll definitely be writing about the process along the way!


Friday, July 31, 2015

Order from the chaos: Reconciling local data with LoC auth records

Arkheion and the Dragon, part II

By the end of last week's post/parable we had Library of Congress (LoC) name authority IDs for many of our person and corporation names, but had a lot of uncertainty as to whether these IDs had been matched correctly. The OpenRefine script we were using to query VIAF for LoC IDs also didn't support searching for any control access types beyond person and corp names.

We weren't quite satisfied with this, so after looking into some of our options, we decided to try a new approach: we would move from OpenRefine to Python for handling VIAF API queries and data processing, add a bit of web scraping, then use more refined fuzzy-string matching to remove false-positives from the API results. By the time we had finished, we had confirmed LoC IDs for over 6500 unique entities (along with ~2000 often hilariously wrong results) and, as an added benefit, were able to update many of our human agent records with new death-dates. All told the process took about a day.

Here's how we did it:

The VIAF API

OCLC offers a number of programmatic access points into VIAF's data, all of which you can see and interactively explore here. Since we're essentially doing a plain-text search across the VIAF database, the "SRU search" API seemed to be what we were looking for. Here is what an SRU search query might look like:

http://viaf.org/viaf/search?query=[search index]+[search type]+[search query]&sortKeys=[what to sort by]&httpAccept=[data format to return]

Or, split into its parts:

http://viaf.org/viaf/search
    ?query=[search index]+[match type]+[search query]
    &sortKeys=[what to sort by]
    &httpAccept=[data format to return]

There are a number of other parameters that can be assigned - this document gives a detailed overview of what exactly every field is, and what values each can hold. It's interesting to read, but to save some time here is a condensed version, using only the fields we need for the reconciliation project:

  1. Search query: how and where to find the requested data. This is itself made up of three parts:
    1. Search index: what index to search through. Relevant options for our project are:
      • local.corporateNames: corporation names
      • local.geographicNames: geographic locations
      • local.personalNames: names of people
      • local.sources: which authority source to search through. "lc" for Library of Congress.
    2. Match type: how to match the items in the search query to the indicated search index -- e.g. exact("="), any of the terms in the query ("any"), all of the terms ("all"), etc.
    3. Search query: the text to search for, in quotes
  2. Sort keys: what to sort the results by. At the moment, VIAF can only sort by holdings count ("holdingscount").
  3. httpAccept: what data format to return the results in. We want the xml version ("application/xml")

Putting it all together, if we wanted to search for someone, say, Jane Austen, we would use the following API call:

http://viaf.org/viaf/search
    ?query=local.personalNames+all+"Jane Austen"+and+local.sources+=+lc
    &sortKeys=holdingscount
    &httpAccept=application/xml

The neat thing about web APIs is that you can try them out right in your browser. Check out the Jane Austen results here! It's an xml document with every relevant result, ordered by number of holdings for each entry worldwide, and including including full VIAF metadata for every entity. That's a lot of data when all we're looking for is the single line with the first entry's LoC id. This is where Python comes in.

Workflow:

Before we dive in to the code, here is the high-level workflow we ended up settling on:

  1. Query VIAF with the given term
  2. If there's a match, grab the LoC auth id
  3. Use the LoC web address to grab the authoritative version of the entity's name.
  4. Intelligently compare the original entity string to the returned LC value. If the comparison fails, then we treat the result as a false positive.

Let's dig in!

VIAF, LC, and Python

First, we wrote an interface to the VIAF API in python, using the built-in urllib2 library to make the web requests and lxml to parse the returned xml metadata. That code looked something like this:


You can see above that the search function takes three values: the name of the VIAF index to search in (which matches to one of our persname, corpname, or geogname tags), the text to search for, and the authority to search within (here LC, but it could be any that VIAF supports).

With the VIAF search results in hand, our script began searching through the xml metadata for the first, presumably most relevant result. All sorts of interesting stuff can be found in that data, but for our immediate purposes we were only interested in the Library of Congress ID:


Now that we had the LC auth ID, we could query the Library of Congress site to grab the authoritative version of the term's name. Here we used BeautifulSoup, a python module for extracting data from html:


Now we had four data points for every term: Our original term name, an unvetted LoC ID number and name, and the type of controlaccess term the item belongs to (persname, corpname, or geogname). As before, there were a number of obvious false-positives, but there were enough terms that we did not have nearly enough time to check through them individually. As Max hinted at in last week's post, this was fuzzywuzzy's time to shine.


Fuzzy Wuzzy was (not) a bear

(also not a Rudyard Kipling poem)

Max gave an overview of fuzzywuzzy, but just as a refresher: it's a python module with a variety of methods for comparing similar strings under different lenses, all of which return a "similarity score", out of 100. Here is what a very basic comparison would look like:

This is fine, but it's not very sophisticated. One of fuzzywuzzy's alternate comparison methods is much better suited for our purposes:

The token_sort_ratio comparison removes all non-alphanumeric characters (like punctuation), pulls out each individual word, puts them back in alphabetical order, and then runs a normal ratio check. This means that things like word order and esoteric punctuation differences are ignored for the purposes of comparison, which is exactly what we want.

Now that we had a method for string comparisons, we could start building more sophisticated comparison code - something that returns "True" if the comparison is successful, and "False" if it isn't. We started by writing some tests, using strings that we knew we wanted to match, and strings we knew should fail. You can see our full test suite here.

As a result of our testing, we decided we would need to have unique comparison methods for each type of controlaccess term we were testing - one for geognames, one for persnames, and one for corpnames. Geognames turned out to be easiest - in that case our test criteria was matched with a basic token_sort_ratio check - names were deemed correct when they had a fuzz score of 95 or higher. Both persnames and corpnames turned out to need a bit more processing before we had satisfactory results. Here is what we came up with:

With this script in hand, all we had to do was run our VIAF/LC data through it, remove all results that failed the checks, then use the resulting data to update our finding aids with the vetted LoC authority links (while removing all the links we had added pre-vetting). Turns out, we ended up with > 4200 verified unique persname IDs, ~1500 IDs for corpnames, and 800 geogname IDs, all of which we were able to merge back into our EADs using many of the methods Max described last week. We also output all the failed results, which were sometimes hilarious: apparently VIAF decided that we really meant "Michael Jackson" while searching for "Stevie Wonder". And, no, Wisconsin is not Belgium, nor is Asia Turkey.

This also gave us a great opportunity to update all of our persnames with death-dates if the LoC term had one and we did not. You can check out our final GitHub commit here - we were pretty happy with the results!.

Postscript

In retrospect there is a lot we could improve about the process. We played things conservatively, particularly for persnames, so our false-positive checking code itself had a number of false-positives. Our extraction of LoC codes from the VIAF search API could be a lot more sophisticated than just mindlessly grabbing the first result - our fuzzy comparisons did a lot to mitigate that particular problem, but since VIAF sorts its results by number of holdings worldwide rather than by exact match, we were left to the capricious whims of international collection policies. The web-request code is also fairly slow - since we didn't want to inadvertently DDoS any of the sites we're querying (and we'd rather not be the archive that took down the Library of Congress website), we needed to set a delay in between each request. When running checks against >10,000 items, even just a one second delay adds up. Even so, it still runs in an afternoon -- orders of magnitude faster than manual checking.


We hope you've found this overview interesting! All code in the post is freely available for use and re-use, and we would love to hear if anyone else has tried or is thinking of trying anything similar. Let us know in the comments!

Friday, July 24, 2015

Arkheion and the Dragon: Archival Lore and a Homily on Using VIAF for Reconciliation of Names and Subjects

I'd like to begin today with a reading from the creation narrative of archives lore, and a homily:

1.1 In the beginning, when Arkheion created libraries and archives, archives were a formless void.

There was no data that could be used to find materials that corresponded to a users' stated search criteria. There was no retrievable data that could be used to identify an entity. There was no data that could be used to select an entity that was appropriate to a users' needs. And, finally, there was no data that could be used in order to acquire or obtain access to the entity described.

Indeed, these were dark times.

1.2 Then Arkheion destroyed Tiamat, the dragon of primeval, archival chaos. 

"Marduk Arkheion and the Dragon" by Professor Charles F. Horne. Here Arkheion channels the spirit of Melvil Dewey, wields thesauri like the Library of Congress Subject Headings (LCSH) and the Getty Research Instittute's Art and Architecture Thesaurus (AAT), and destroys Tiamit, the dragon of primeval, archival chaos. [1]

In ancient times, libraries and archives began to organize their holdings. First by shape, then by content, then in catalogs. It wasn't long before bibliographic control as we know it today provided the philosophical basis for cataloging and our fore-librarians and fore-archivists began to define the rules for sufficiently describing information resources to enable users to find and select the most appropriate resource.

Eventually, cataloging, especially subject cataloging, and classification took root and universal schemes which cover all subjects (or, at least, the white male subjects) were proposed and developed.

1.3 Producers, Consumers and Managers lived in the fruitful, well-watered Garden of Arkheion.

And Arkheion saw that archives were good. 

1.4 But darkness covered the face of the deep. Producers, Consumers and Managers lived in paradise until the storied "fall" of Managers.

The "Fall of Man[agers]" by Lucas Cranach the Elder. [2]

To be human is to err. Human nature is fundamentally ambiguous, and it was only a matter of time before we strayed from the straight path of LCSH and AAT. We were like sheep without their shepherd. [3]

Why? Why! Maybe it was our haste. Maybe it was "human error." Maybe our fingers were just tired. Maybe we didn't want to keep track of names changes and death dates, OK! 

For better or worse, eventually the terms we were entering in our Encoded Archival Descriptions (EADs) were not the terms laid out by the controlled vocabularies we were supposed to be using. We were forever, even ontologically, estranged from Arkheion.

1.5 We lived in darkness until a savior appeared, whom two prophets (the Deutsche Nationalbibliothek and the Library of Congress) had foretold (all the way back in 2012).

The Virtual International Authority File (VIAF) is an international service designed to provide convenient access to the world's major name authority files. It's aim is to link national authority files (such as the LCSH and the Library of Congress Name Authority File or LCNAF) to a single virtual authority file. A VIAF record receives a standard data number, contains the primary "see" and "see also" records from the original records, and refers to the original authority records. These are made available online for research, data exchange and sharing. Even Wikipedia entries are being added! Alleluia!

1.6 At long last, the Virtual International Authority File (VIAF) offered us a path to reconciliation with the thesauri used by Arkheion.

And that's what this post is about, using the VIAF Application Program Interface (API) to reconcile our <controlaccess> and <origination> terms!

1.7 Amen. So be it.

So say we all. So say we all!

Using VIAF to Reconcile Our <controlaccess> and <origination> Terms


Reconciling <controlaccess> and <origination> headings, or any headings, for that matter, to the appropriate vocabularies using VIAF is a fairly simple two-step process. Somehow, we managed to make it five steps...

As a result, this is a two-part blog post!

  1. Initial Exploration and Humble Beginnings


Reconciling our subject and name headings to the proper authorities is something we've been considering for quite some time. Since we were spending so much time cleaning and normalizing our legacy EADs and accession records to prepare them for import to ArchivesSpace as part of our Archivematica-ArchivesSpace-DSpace Workflow Integration project, we figured that we might as well spend some time on this as well.

We'd heard about initiatives like the Remixing Archival Metadata Project (RAMP) and Social Networks and Archival Context (SNAC) (and, of course, Linked Data!), but all of those seemed pretty complicated compared to what we wanted to do, which boiled down to adding an authfilenumber attribute to <controlaccess> and <origination> sub-elements (like <persname>, <famname> and <corpname>, just to name a few) so that they would populate the "Authority ID" field in ArchivesSpace.

What we wanted.


Why we wanted it (at least initially).

During our initial exploration, we ran across this GitHub repository. Using Google Refine and stable, publicly available APIs, the process described in this repository automatically searches the VIAF for matches to personal and corporate names, looks for a Library of Congress source authority record in the matching VIAF cluster, and extracts the authorized heading. The end result is a dataset, exportable from Google Refine, with the corresponding authorized LCNAF heading paired with the original name heading, along with a link to the authority record on id.loc.gov.

Cool! This was exactly what we needed! Even better, it used tools we were already familiar with (like OpenRefine)! And even better than that, it was designed by a colleague at the University of Michigan, Matt Carruthers. Go Blue!

All we needed to do was pull out the terms we wanted to reconcile. For all of you code junkies out there, here's what we used for that (at least initially--this turned out to be a very iterative process). This Python script goes through our EADs and spits out three lists, one each for de-duplicated <corpame>, <persname> and <geogname> elements:


As always, feel free to improve!

Then, we added those lists to OpenRefine, created column headings (make sure you read the README!), and replayed Matt's operations using the JSON in GitHub, and got this:

OpenRefine

Simple! It didn't find a match for every term, but it was a good start! We were feeling pretty good...

It was about this time that we realized that we had forgotten a very important step, normalizing these terms in the first place! Oops!

  2. Normalizing Subjects (Better Late than Never!)


Note: For this, I've asked our intern, Walker Boyle, to describe the process he used to accomplish this.

Before we could do a proper Authority ID check, we needed to un-messify our controlled access terms. Even with our best efforts at keeping them consistent, after multiple decades there is inevitably a lot of variation, and typos are always a factor.

Normalizing them all originally seemed like something of a herculean task--we have over 100,000 individual terms throughout our EADs, so doing checks by hand would not be an option. Happily, it turns out OpenRefine has built-in functionality to do exactly this kind of task.

Given any column of entries, OpenRefine has the ability to group all similar items in that column together, allowing you to make a quick judgement as to whether the items in the group are in fact the same conceptual thing, and with one click choose which version to normalize them all into.

The first step in our process was to extract all of our control-access terms from our EADs along with their exact xml location, so that we could re-insert their normalized versions after we made the changes. This is really easy to do with Python's lxml module, and the process only takes a few seconds to run -- you can see the extraction code here. From there you just throw the output CSV into OpenRefine and start processing.

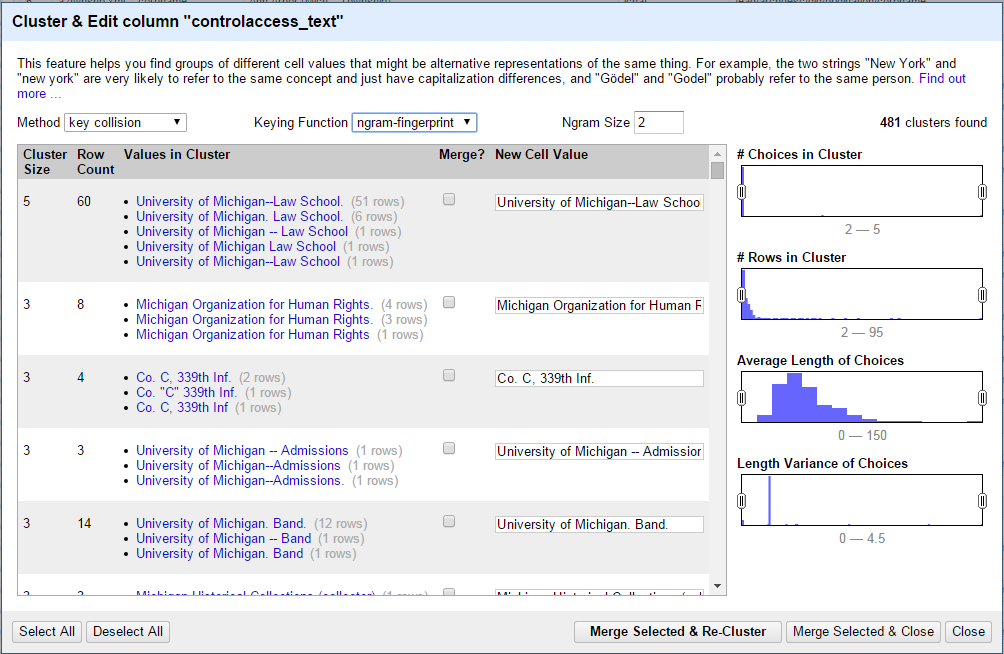
And it's super simple to use: select "Edit cells" -> "Cluster and edit") from the file menu of the column you want to edit, and choose which clustering method to use (we've found "ngram-fingerprint" with an Ngram size of 2 works best for our data, but it's worth exploring the other options). Once the clusters have been calculated, you just go down the list choosing which groups to merge into a chosen authoritative version, and which to leave alone. Once you're satisfied with your decisions, click the "Merge selected and re-cluster" button, and you're done!

Clustering in OpenRefine

To re-insert the changed values into our EADs, we just iterated through the normalized csv data, reading the original xml path for each item and telling lxml to assign the new text to that tag (you can see our exact implementation here). One git push later, we were done. The whole process took all of an afternoon. In just a few hours, we were able to normalize the entirety of our control-access terms: some 61,000 names, corporations, genre-forms, locations, and subjects. That's pretty incredible.

  3. Running the Normalized Versions through the LCNAF-Named-Entity-Reconciliation Process (Should Have Been the First Step, Oh Well)


From there, it was just a matter of exporting the CSV, creating a dictionary using the Name and LC Record Link columns, like so:


And reincorporating them back into the EAD, like so:


Zlonk! We were reconciled! Again, we were feeling pretty good...

But again we realized that we had gotten a little ahead of ourselves (or at least I did). After some sober reflection after the high of reconciliation, there were still a couple of things wrong with our approach. First, there were a lot of "matches" returned from VIAF that weren't actual matches. Some of these were funnier than others, and we tweeted out one of our favorites:

No, VIAF. Wonder, Stevie, 1950- is NOT the same as Jackson, Michael, 1958-2009. https://t.co/Wa9EzLG2in
— UM BHL Curation (@UMBHLCuration) July 9, 2015

Long story short, we needed a way to do better matching.

  4. Enter FuzzyWuzzy


No, not the bear. FuzzyWuzzy is a Python library to which Walker introduced us. It allows you to string match "like a boss" (their words, not mine)! It was developed by SeatGeek, a company that "pulls in event tickets from every corner of the internet, showing them all on the same screen so [buyers] can compare them and get to [their] game/concert/show as quickly as possible."

The following quote would make Arkheion proud:

Of course, a big problem with most corners of the internet is labeling (sound familiar catalogers and linked data folks?). One of our most consistently frustrating issues is trying to figure out whether two ticket listings are for the same real-life event (that is, without enlisting the help of our army of interns).

That is, SeatGeek needs a way to disambiguate the many ways that tickets identify the same event (e.g., Cirque du Soleil Zarkana New York, Cirque du Soleil-Zarkana or Cirque du Soleil: Zarkanna) so that in turn buyers can find them, identify them, select them and obtain them.

We employed FuzzyWuzzy's "fuzzy" string matching method to check string similarity (returned as a ratio that's calculated by how many different keystrokes it would take to turn one string into another) between our headings and the headings returned by VIAF. Walker will talk more about this (and how he improved our efforts even more!) next week, but for now, I'll give you a little taste of what FuzzyWuzzy's "fuzz.ratio" function is all about.

FuzzyWuzzy's fuzz.ratio in action.

As you can see, the higher the ratio, the fewer the number of <persname> and <corpname> elements to which we get to add an authfilenumber attribute (certainly fewer than just blindly accepting what VIAF sent back in the first place!). In the end we decided that it was better to have fewer authfilenumber attributes and fewer mistakes than the opposite! You're welcome future selves!

  5. The Grand Finale


Tune in next week for the grand finale by Walker Boyle!

**UPDATE!**
Check out the exciting conclusion... Order from the chaos: Reconciling local data with LC auth records

Conclusion

This has been an exciting process, and, for what it's worth, easier than we thought it would be.

While we originally started doing this to be able to get Authority IDs into ArchivesSpace, we have been getting really exciting thinking about all the cool, value-added things we may be able to do one day with EADs whose controlled access points have been normalized and improved in this way. Just off the top of my head:

  • facilitating future reconciliation projects (to keep up with changes to LCNAF);
  • searching "up" a hierarchical subject term like Engineering--Periodicals;
  • adding other bits from VIAF (like gender values, citation numbers, publication appearances);
  • interfacing with another institution's holdings;
  • helping us get a sense of what we have that's truly unique;
  • making linked open data available for our researchers; and
  • of course, adding Wikipedia intros and pictures into our finding aids! That one hasn't been approved yet...


Can you think of more? Have you gone through this process before? Let us know!

[1] "Marduk and the Dragon" by Prof. Charles F. Horne - Sacred Books of the East *Babylonia & Assyria* 1907. Licensed under Public Domain via Wikimedia Commons - https://commons.wikimedia.org/wiki/File:Marduk_and_the_Dragon.jpg#/media/File:Marduk_and_the_Dragon.jpg
[2] "Lucas Cranach (I) - Adam and Eve-Paradise - Kunsthistorisches Museum - Detail Tree of Knowledge" by Lucas Cranach the Elder - Unknown. Licensed under Public Domain via Wikimedia Commons - https://commons.wikimedia.org/wiki/File:Lucas_Cranach_(I)_-_Adam_and_Eve-Paradise_-_Kunsthistorisches_Museum_-_Detail_Tree_of_Knowledge.jpg#/media/File:Lucas_Cranach_(I)_-_Adam_and_Eve-Paradise_-_Kunsthistorisches_Museum_-_Detail_Tree_of_Knowledge.jpg
[3] I know what you're thinking. If Arkheion is omniscient, omnipotent and omnipresent (even omnibenevolent!), how could this be so? Perhaps that's a topic for a future blog post. Also, Arkheion is not real; this whole story is made up.

Tuesday, July 21, 2015

ArchivesSpace Donor Details Plugin

In a previous post about our ArchivesSpace implementation, Max detailed some of the things that ArchivesSpace is not (or, at least, is not yet), including some of the desired and/or required features for our local implementation of ArchivesSpace that are not currently present in the out-of-the-box ArchivesSpace distribution. One of the lacking features that Max mentions relates to information that we track for people and organizations who donate collections to the Bentley. 

Each of our donors has a unique donor number that we use to track accessions, organize case files, detail provenance in our finding aids and catalog records, and to conduct other fundamental archival functions. For example, the donor number of the source of a collection is indicated in the 500 field of that collection's MARC record and in the acquisition information section of that collection's finding aid. Donor numbers are essential components of our legacy data, and will continue to play a significant role in our day-to-day operations going forward. The ability to store and generate donor numbers in ArchivesSpace is necessary functionality for us that is currently not supported in the stock application.

ArchivesSpace Agents

In ArchivesSpace, each person, family, corporate entity, or software that relates to a resource or accession as a creator, source, or subject is linked to that resource or accession from an agent record. This will provide some really great functionality in that we will only need to create an agent record for a unique entity once and will thereafter simply add that agent as an agent link, saving us the hassle of looking up a name in LoC, our MARC records, or our finding aids to ensure consistent use across collections each time we add it as a source, creator, or subject. The way this currently works for us does, despite our best efforts, occasionally lead to slight variations in spelling or forms of names and subjects across collections or typos in our finding aids due to the fact that we must type each subject or agent rather than select an existing subject or agent from a controlled value list (we're working on fixing those problems, though; more to come on that from Max and Walker soon!)

While having a controlled list of agents in ArchivesSpace will in many ways be an improvement over our current practice, it also means that our ArchivesSpace agent records will need to include all of the information we might need to track about an agent in one place. ArchivesSpace agent records contain many universally applicable fields that permit a wide range of users to generate agent records with links to authority records, various name forms, contact information, notes, and so on. We realize that not every institution will use donor numbers in the same way as us and, as Max notes in his blog post, "it wouldn't make sense for us to request ArchivesSpace to develop functionality that only works for one user," which means that it's up to us to find a solution that will meet our local needs.

Our first thought was to try to identify some field in the existing ArchivesSpace agent records that we could use to store donor numbers. We took a look at the options in agent name forms, contact details, and so on to determine if any of the existing fields would work.

ArchivesSpace person name form

We briefly considered adding multiple name forms for each donor -- one name form using the fields as they were intended in the proper DACS, RDA, or other fashion and another name form using a field, such as "Number" or "Qualifier" to store the donor number. We ultimately decided, however, that this would be a hacky approach, and it would be better to come up with a more sophisticated solution.

ArchivesSpace Plugins

One of the great things about ArchivesSpace that we have mentioned on this blog before, and will undoubtedly mention again, is the fact that ArchivesSpace is open source, allowing users to take a complete look at the inner workings of ArchivesSpace and modify or extend it to meet their needs. Even more significant is that the ArchivesSpace team has made it easy for users to add plugins to "customize ArchivesSpace by overriding or extending functions without changing the core codebase." Making changes to the core codebase could cause unintended issues down the road when upgrading to new version of ArchivesSpace, but plugins are modular extensions of the application that can be quickly copied over to a new version of ArchivesSpace, easily tweaked to accommodate any changes, and readily shared with others to allow other users who desire the same functionality to drop the plugin into their local ArchivesSpace instance.

The ArchivesSpace distribution includes a few exemplar plugins that demonstrate the power of plugins and the relative ease with which they can be implemented. This plugin, for example, generates a new unique accession number, following a predefined format, each time a new accession record is created. Additionally, Hudson Molonglo makes numerous plugins available on their GitHub, including the excellent container management plugin that we intend to use in our ArchivesSpace instance. Among the plugins that they have developed is a plugin to add additional contact details to an agent record. Browsing the existing ArchivesSpace plugins, combined with some existing understanding of how to create a plugin based on our experiences adding a custom EAD importer and from reading the blog posts "Writing an ArchivesSpace Plugin" by Mark Triggs and "Customizing your ArchivesSpace EAD importers and exporters" by Chris Fitzpatrick, inspired me to attempt to create a plugin to extend the existing ArchivesSpace agent model to include donor numbers (and other necessary but lacking fields).

Donor Details Plugin

After just a few days of occasional work on the plugin, I developed a functioning prototype that adds a Donor Details option to each agent record, including a field to enter a donor number and a check box that, when selected, will automatically generate a new donor number by iterating the current maximum donor number by one. The plugin also ensures that each donor number is unique, will only display the donor details field in an existing agent record if donor details exist for that agent, and will only allow users to select the auto-generate check box if there is not an existing donor number for the selected agent. The current code for the plugin, including slight variations for ArchivesSpace versions 1.1.2, 1.2.0, and 1.3.0, is on our GitHub. Here's how it works:

The donor details plugin currently consists of four directories: backend, frontend, migrations, and schema, each of which follow the naming conventions and functions detailed in the ArchivesSpace plugin README.


Backend

The backend directory contains one subdirectory, model, which is where the new backend modules and classes used in the donor details plugin are defined. Within the model directory are five files and another subdirectory, mixins. 


The four files ending in _ext.rb (agent_corporate_entity_ext.rb, agent_family_ext.rb, agent_person_ext.rb, agent_software_ext.rb) are extensions of existing components of the ArchivesSpace backend model. Each file contains only one line that extends the model for each agent type by including the donor details module. The donor details module itself is defined in the mixins directory, in the file donor_details.rb

donor_details.rb


Currently, the relationship between the donor details module and each donor detail record is one-to-many; each agent can have one array of donor details, which itself may have one or more donor detail records associated with it. This may change at some point (the relationship between agent and donor number should really be one-to-one), but I used existing components of agent records, such as contact details, that have a one-to-many relationship with agents as models for the donor details plugin, which is why it is designed as such (it also is not really a problem, since it will never matter that we can add multiple donor numbers to an agent as long as we don't). 

What this means in terms of the functionality of the plugin is that each agent record includes the donor details (plural) module, which itself contains records of the type donor detail (singular). This is an important distinction to note, as a good deal of the functionality of the plugin (not to mention the functionality of ArchivesSpace and other Ruby on Rails applications) is dependent upon using consistent naming conventions across all components. Throughout the entire plugin, including within the backend models, the database tables, the frontend displays, and the ArchiveSpace JSONModel schema definitions, the plural and singular forms of donor_detail are used consistently and deliberately following the required naming conventions. The DonorDetails module includes records corresponding to the donor_detail JSONModel, which are stored in the donor_detail table in the database, which are displayed using the donor_detail form template in the frontend, and so on. 

The remaining file in the backend/model directory, donor_detail.rb, is where the backend components of each singular donor detail record is defined, including where the links between the model and the relevant table in the ArchivesSpace database and the relationship between the model and the relevant JSONModel schema defintion are made. It's also where the bits of code that automatically generate a new donor number and that validate the uniqueness of donor numbers are located.

donor_detail.rb

The code in backend/model/donor_detail.rb is another really great example of how extensible ArchivesSpace is when plugins are used in conjunction with the existing ArchivesSpace codebase. Functions in this file, such as auto_generate and validates_unique, are used throughout the ArchivesSpace application to automatically generate numbers and display strings and to enforce uniqueness constraints (see both in use here, for example). I didn't actually have to write any code to define the auto_generate or validates_unique functions. All I had to do was find existing applications of those functions in the ArchivesSpace code to figure out how to put them to my own use. There are plenty of examples of this kind of reusable, modular code across the ArchivesSpace application, and it is what really makes it possible to easily add new features and functionality to ArchivesSpace (that is, provided you have the time to search and browse through the code in the ArchivesSpace GitHub in to find those functions).

Schemas

The schemas directory in the donor details plugin includes only two files, abstract_agent_ext.rb and donor_detail.rb.

The file abstract_agent_ext.rb works in much the same way as the previously discussed _ext.rb files: it extends the existing abstract_agent schema, specifically by adding a donor details array, containing one or many donor detail items, to each agent record.

abstract_agent_ext.rb

The file donor_detail.rb is where the donor_detail JSONModel schema is defined:

donor_detail.rb

This is where the properties of each singular donor detail record are defined. Currently, there are only a few properties: number (a string), number_auto_generate (a boolean), and dart_id (another string that Max and I just added this morning to explore linking our donors to the University's Development office donor database). "Number" and "dart_id" are fairly self-explanatory, and number_auto_generate is the property that will be set to true or false, in the ArchivesSpace staff interface, using a check box to indicate whether or not the donor number should be automatically generated by the system. Appending _auto_generate to a property is another one of those already-existing ArchivesSpace features (see it used elsewhere to indicate whether a sort name ought to be auto-generated) that can be used to later make use of yet another existing ArchivesSpace function when implementing the frontend check box. There really are a lot of useful reusable things in the ArchivesSpace code if you look for them!

Migrations

Since we'll actually need these donor numbers to be stored somewhere in the ArchivesSpace database, we include a file, 001_donor_detail.rb, in the donor details plugin's migrations directory that creates a table with the necessary fields in the ArchivesSpace database. Here we also follow the proper naming conventions: the table we create is called donor_detail (same as the JSONModel schema and backend model) and the columns in that table are number, number_auto_generate, and dart_id (same as the names of properties in the donor_detail JSONModel schema). The table also includes columns for agent_person_id, agent_family_id, agent_corporate_entity_id, and agent_software_id, which will be populated with the unique identifier for an agent when it is created, to establish the relationship between the agent and donor detail tables.

Frontend

The frontend directory contains all of the code that displays a donor detail form in the ArchivesSpace staff interface, so that staff can add donor details when creating or editing an agent and see any existing donor information when viewing an agent. The frontend directory contains three subdirectories: assets, locales, and views.

The assets directory contains only one file: donor_detail.crud.js, which includes the JavaScript that controls the check box and text field in the donor detail form. Essentially what it does is make the donor number text field read only and display the text "System generates when saved." This is another bit of code that I "borrowed" from the existing ArchivesSpace application, specifically from the bit of code that controls the check box for agent sort names.

The locales directory also contains only one file: en.yml, which is where the English language translations for each part of the donor details plugin are located. It's the file that ArchivesSpace uses to know what to display to staff using the frontend interface for things like "number," "dart_id," and so on. An en.yml file in a locales directory is another really helpful feature of ArchivesSpace (see the entire ArchivesSpace en.yml file). It allows you to centrally maintain, modify, or override the language that will be used in the ArchivesSpace public and staff interfaces and to then refer to the entry in the en.yml file using a variable name, rather than requiring you to change every instance of English language text that you or the ArchivesSpace developers would have used throughout numerous html files. 

The html files that integrate the donor details plugin into the staff interface are located in the views subdirectory, which in this plugin contains only an agents subdirectory. The views directory (and corresponding subdirectories) are where the code is located that actually makes a form or a field display in the ArchivesSpace web interface. The views/agents directory contains three files: _donor_details.html.erb, _form.html.erb, and show.html.erb

The only unique-to-this-plugin file in this directory is _donor_details.html.erb. The other two files override the stock ArchivesSpace agents _form.html.erb and show.html.erb files to make them display the form template defined in _donor_details.html.erb in addition to all of the already-existing agent forms.

_donor_details.html.erb

The template in _donor_details.html.erb will display a label and text box for donor number along with an automatable check box if the donor number is blank, otherwise it will display only the donor number label and text box. As with a lot of components of this plugin, this code follows the standard form of other ArchivesSpace templates, such as the contact details template. 

The change that I made to _form.html.erb can be found on line 27, and the changes made to show.html.erb on lines 93-121. The form and show files essentially replicate the function of surrounding bits of code that do things like display the templates for name forms and contact details, and uses that code to display the template for donor details, including a label and text field for donor number, including a check box to automatically generate the number, and a label and text field for DART ID. 

The final product in the staff interface looks like this:


That may look like a small achievement considering all of the bits and pieces that went into making a tiny, two-fields and a check box form appear in ArchivesSpace agent records, But, when you consider that our local implementation of ArchivesSpace can now include core functionality that it did not have before, that tiny form is really quite significant, and learning how to develop a plugin and spending time troubleshooting all of the errors that arose due to me being an archivist, not a programmer, was well worth the effort. Working on this plugin was also a really useful lesson in just how extensible and modifiable ArchivesSpace is by design, and it opens up a world of possibilities for us as we start to dive into migrating our legacy accession records (plenty more on that to come), develop new conventions for using ArchivesSpace, and think about how we can use the system to its fullest extent.

Disclaimer

We've said it on this blog before, but it's worth stressing again: we are archivists, not programmers. While this plugin has been fully functional and has not had any issues, yet, I would not be surprised if there are bits of the code that could have been written in a more understandable, concise, sophisticated, or otherwise programmatically correct way. I would be very appreciative of any feedback, criticism, pointers, etc. that any more experienced programmers reading this blog might have!